A cracked slab can look “fine” until you roll epoxy on it – then every line you ignored suddenly shows up like a highlighter. Worse, the coating can split where the concrete keeps moving, or peel if moisture is pushing up through the slab. So the real question isn’t just can you epoxy over cracked concrete. It’s whether your cracks are the kind epoxy can live with, and what has to happen before the first coat goes down.
Can you epoxy over cracked concrete?
Yes – in many cases you can epoxy over cracked concrete and get a durable, clean finish. But epoxy is not a magic bandage. It is a hard, bonded coating system, and it will only perform as well as the slab underneath it.
If the crack is stable (not actively moving), properly prepared, and correctly repaired, epoxy can bridge it visually and hold up under traffic. If the crack is moving, contaminated, damp, or poorly repaired, the epoxy may “telegraph” the crack line, split along it later, or lose adhesion around it.
The difference between a floor that lasts and a floor that fails usually comes down to three things: identifying what kind of crack you have, repairing it with the right materials, and grinding the surface so the epoxy has something solid to grab.
Why cracks matter under epoxy
Concrete cracks for lots of reasons: shrinkage as it cures, temperature changes, settlement, and impact. Epoxy doesn’t stop those forces. What epoxy does well is resist wear, chemicals, and staining, and create a sealed surface that’s easy to clean. What it does poorly is stretch.
That’s why a crack that continues to move is the enemy of a rigid coating. Even if your epoxy adheres perfectly, ongoing movement can mirror through the coating as a visible line. In higher movement scenarios, it can actually fracture the epoxy film.
Cracks also matter because they can be entry points for moisture and contaminants. Oil, grease, salts, and water migration through the slab can all interfere with adhesion. If the slab is pushing moisture vapor up, the best-looking epoxy job in the world can blister or peel.
Which cracks are “epoxy-able” (and which aren’t)
Some cracking is common and manageable. Other cracking is a warning sign that you need a different repair approach – or that you need to solve a structural issue first.
Hairline and shrinkage cracks
These are thin, often random cracks that don’t show height differences from one side to the other. They’re the most common in garages and older slabs. In many cases, they can be opened, cleaned, filled, ground flush, and coated successfully.
You may still see a faint line later, especially with light-colored or high-gloss finishes, but performance can be excellent when the prep is right.
Wider cracks that are stable
If a crack is wider but not moving, it can often be repaired with a rigid crack filler or epoxy mortar and then coated. The key is to create a repair that is fully bonded and flush so the coating system has a uniform surface.
Cracks with movement, vertical displacement, or heaving
If one side of the crack is higher than the other (a “lip”), or the crack continues to open and close, epoxy alone is not a reliable fix. You might be able to grind the lip and make it safer and more level, but the underlying movement can continue to telegraph through.
If there’s active heaving, settlement, or repeated cracking after prior repairs, treat that as a red flag. It’s better to address the cause before investing in a coating.
Expansion joints and control joints
These aren’t “cracks,” but they behave like one under coatings. Joints are designed to move. If you fill and coat over them rigidly, they often reappear. There are ways to handle joints depending on the look you want and the tolerance you have for future joint lines, but they should be planned – not ignored.
The prep that makes epoxy succeed on cracked slabs
If you only remember one thing: epoxy sticks to properly prepared concrete, not to dust, laitance, paint, curing compounds, or oily residue. And crack repair sticks best when the crack is clean, dry, and opened to accept filler.
Step 1: Confirm the slab is dry enough
Moisture is one of the biggest reasons epoxy fails. A slab can look dry on top and still have moisture vapor pressure coming through. In parts of Sydney and across NSW, older garages and ground-level slabs can be prone to moisture issues, especially after heavy rain or where drainage is poor.
A proper assessment may include moisture testing and a plan for a moisture-tolerant primer if needed. Skipping this step is how people end up with blistering, whitening, or sections that debond.
Step 2: Clean like adhesion depends on it (because it does)
Cracks often contain contaminants. In garages, it’s commonly oil and tire residue. In commercial areas, it can be grease, chemicals, or ground-in dirt. Surface cleaning is important, but it’s not enough by itself – contaminants can soak into porous concrete and sit inside the crack.
Step 3: Mechanically grind the concrete
Acid etching is not a substitute for professional grinding when you want a long-wearing epoxy floor. Grinding removes the weak surface layer and opens the concrete profile so epoxy can mechanically bond.
Grinding also levels out minor surface irregularities and helps expose the true condition of the slab. With cracked floors, that matters because you want to see what you’re actually repairing, not what dust and old coatings are hiding.
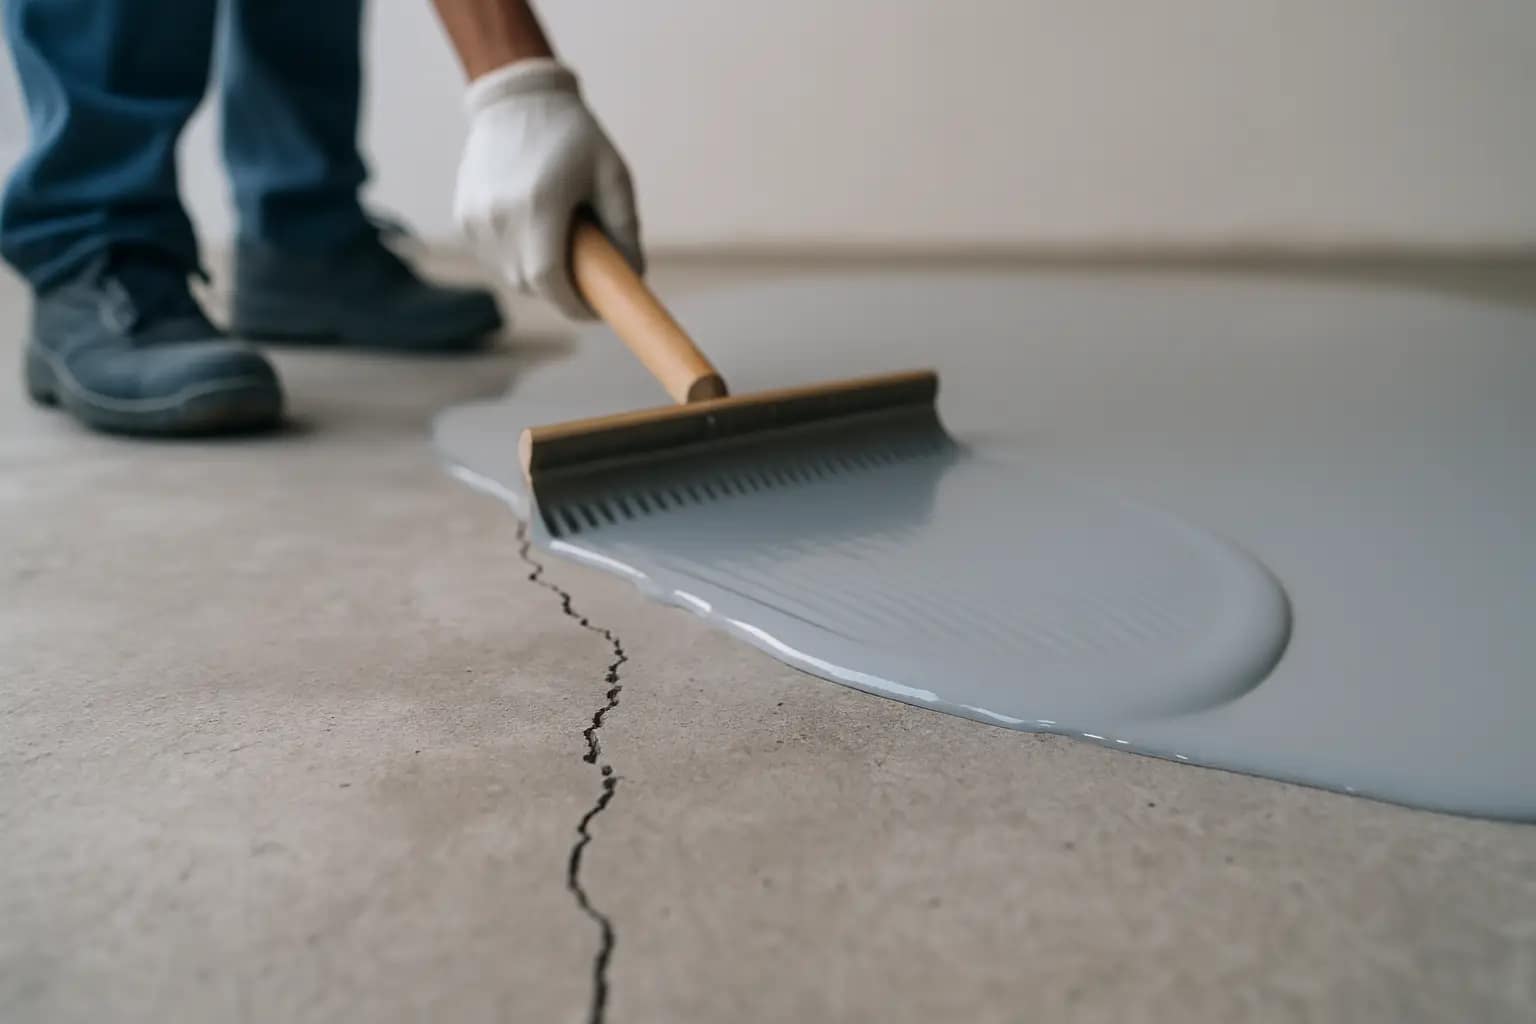
Step 4: Open, clean, and fill cracks properly
Most cracks need to be “chased” – widened slightly into a V or U profile – so the repair material can penetrate and bond. Then they should be vacuumed thoroughly (dust is the silent killer of repairs).
Repair materials vary based on the crack and the system. Rigid epoxy fillers work well for many stable cracks. Polyurea and polyurethane options can be used where a bit more flexibility is helpful, but product choice needs to match the coating system and the expected movement.
After filling, repairs should be ground flush. If the repair sits proud, it will show. If it’s low, it can create a visible trough and a weak point.
Step 5: Build the right epoxy system on top
A proper epoxy floor is usually a system: primer, build coat, and topcoat. The topcoat (often polyurethane or polyaspartic) is what takes the UV, abrasion, and chemical abuse. In garages, a UV-stable topcoat matters if there’s sunlight exposure, otherwise yellowing can occur.
For safety, non-slip aggregate can be incorporated, especially in workshops, commercial kitchens, or any area that sees water, oils, or frequent cleaning.
What results should you expect after coating a cracked slab?
Even when cracks are repaired correctly, it’s fair to expect that some crack lines may faintly show over time. Concrete moves with seasons, and coatings are thinner than people think. Decorative flake systems tend to hide repairs better than solid colors because the visual pattern breaks up the eye line.
If you want a perfectly monolithic look, that’s often more achievable on newer, stable slabs or after more extensive resurfacing work. For many real-world floors, the win is performance: a sealed, easy-to-clean surface that stands up to traffic and reduces dusting.
Common failure points (and how to avoid them)
Most epoxy failures on cracked concrete trace back to a few preventable issues: coating over dirty or glossy concrete, using patch products that don’t bond well, skipping grinding, or ignoring moisture. Another common mistake is filling cracks and coating on the same day without respecting cure times, which can trap solvents or create soft repair zones.
Also watch for “quick fixes” like caulk in cracks under epoxy. Many caulks remain flexible and can interfere with adhesion or show as a soft line in the finished floor.
When it’s smart to call a pro
If your slab has multiple crack types, visible lippage, signs of moisture, or previous coating failure, you’ll usually save time and money by getting it assessed before you buy materials. Professional teams can profile the slab with dust-controlled grinding, choose repair compounds that match the system, and install a coating build that’s designed for your traffic and cleaning needs.
If you want that kind of end-to-end approach in Sydney or across NSW, Floor Masters handles surface prep, crack repairs, and epoxy systems as one package, so the coating performance isn’t left to guesswork. You can start with a fast quote at https://Floormasters.com.au.
A closing thought before you coat
Cracks don’t automatically disqualify a slab from epoxy – they just force you to be honest about what the concrete is doing. If the crack is stable and you prep it like adhesion matters, epoxy can turn a tired, dusty floor into a tough, safer surface that’s built for real traffic. If the slab is moving or wet, the smartest move is to fix the cause first and then coat with confidence.