A garage or warehouse epoxy floor almost never “fails” because the epoxy was weak. It fails because the concrete moved, breathed moisture, or kept shedding dust – and cracks are where those problems concentrate.
If you want a coating that stays bonded, cleans easily, and doesn’t telegraph lines back through the finish, you have to repair cracks in concrete floor before epoxy goes down. Not with a quick smear of filler, but with the right material, the right profile, and the right expectations about what cracks can and can’t do.
Why crack repair matters before epoxy
Epoxy is hard, durable, and chemical-resistant. It’s also honest. If the slab has a crack that opens and closes, epoxy can’t magically stop that movement. What good crack repair does is stabilize what can be stabilized, prevent edge lift, and create a sound, continuous surface so the coating has uniform support.
Cracks also act like collection points for dust, oil, and moisture. If contamination is sitting down in the crack, you’re basically painting over a weak seam. That’s when you see telltale problems later: a glossy floor with a dull “zipper” line, a ridge you feel underfoot, or a flake that starts at the crack and spreads with traffic.
Start by identifying what kind of crack you have
Before choosing a repair product, you need to know whether you’re dealing with cosmetic shrinkage or active movement.
Hairline shrinkage cracks are common in garages and older commercial slabs. They’re usually thin, fairly straight, and not vertically displaced. These are often stable and repair well, as long as the slab is dry and properly prepared.
Structural or movement cracks are different. If the crack has one side higher than the other (lippage), if it widens seasonally, or if there’s a pattern that follows a load line or a joint, assume it’s moving. You can still coat the floor, but the system selection and repair strategy changes because the goal becomes risk reduction, not “erase the crack forever.”
If water is darkening the concrete around the crack, or you’ve got efflorescence (that white salt residue), moisture is part of the story. That needs attention before any epoxy decision, because moisture pressure can push coatings off the slab.
What not to do (the shortcuts that cause call-backs)
A lot of crack repairs fail because someone tried to keep it simple.
Silicone and flexible caulks don’t belong under epoxy. They can contaminate surrounding concrete and cause fish-eyes or adhesion loss.
Patch-and-paint kits are another common trap. Many are too soft, too porous, or not compatible with the epoxy system being installed. Under traffic, they compress or debond and you’ll see the repair “print” through the coating.
And if the plan is to skip grinding and just fill cracks, you’re leaving the slab’s weak top layer in place. Epoxy bonds best to properly profiled concrete, not to dusty laitance.
The right workflow to repair cracks in concrete floor before epoxy
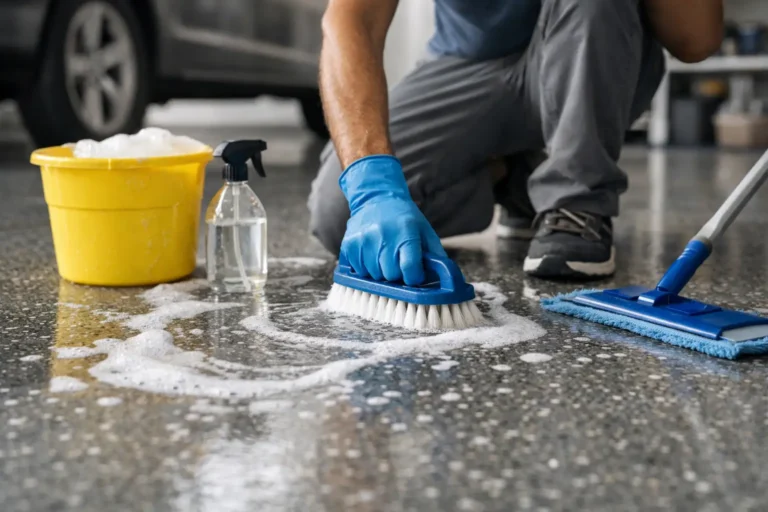
Step 1: Get the slab clean – especially the crack
Degrease first if this is a garage, workshop, or any area that’s had vehicles, forklifts, or equipment. Oil migrates deep and loves to sit in cracks. If you don’t remove it, the repair material may not bond, and epoxy won’t bond to the repair.
After cleaning, the crack has to be dry. Repairs done over damp concrete often look fine on day one and fail later.
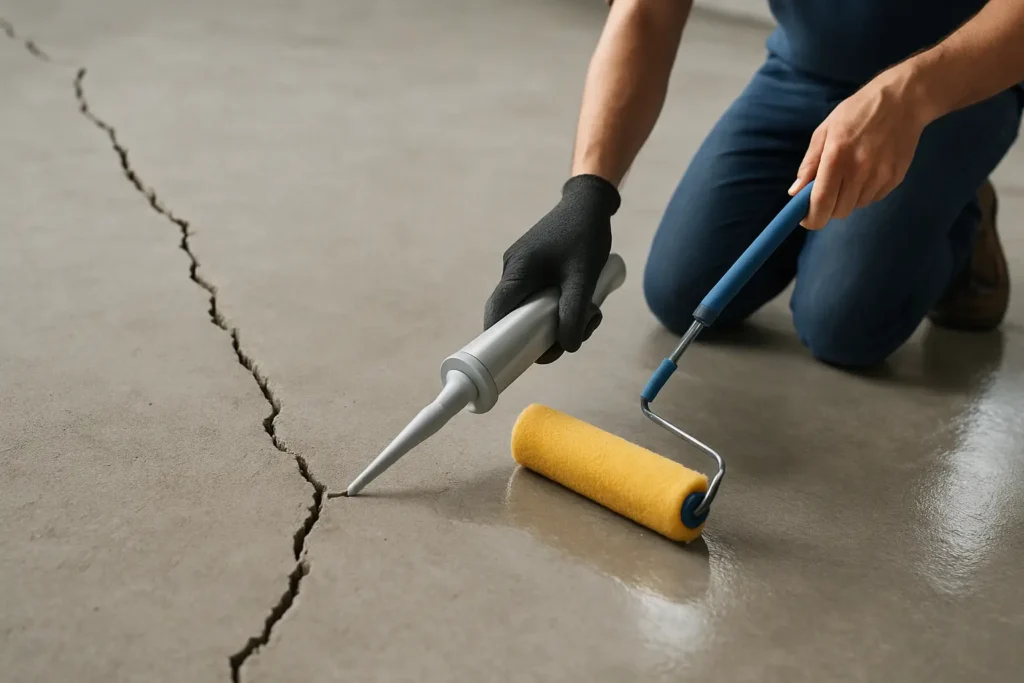
Step 2: Open the crack so the repair can lock in
Hairline cracks can’t be reliably filled if they’re left as a razor-thin surface line. The repair needs depth and sidewall contact.
Professionals usually chase cracks with a V-shaped or U-shaped channel using a grinder fitted with a crack-chasing blade. This removes weak edges and creates a consistent groove so the repair material can key into solid concrete.
If you see crumbling edges, keep chasing until you hit sound concrete. Filling over loose, sandy edges is just hiding the problem.
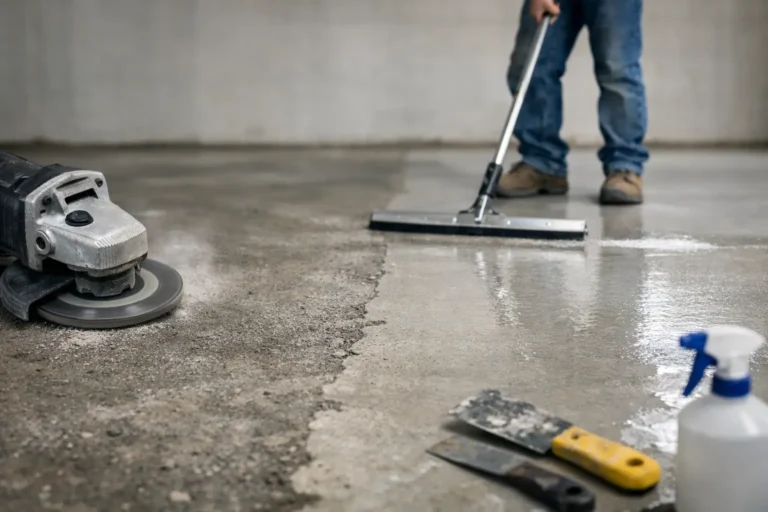
Step 3: Remove dust completely
This step looks minor, but it’s where a lot of otherwise “good” repairs go wrong.
After chasing, vacuum thoroughly with a proper dust extractor. Dust left in the groove acts like a bond breaker. Compressed air can help, but it should be used carefully – you don’t want to blow dust back onto the surface you’re about to coat.
If you’re planning an epoxy floor, dust control during prep matters for your health and for the finish quality. It also keeps repair material from being contaminated while it cures.
Step 4: Choose the correct repair material (it depends)
The best product depends on crack behavior and the floor’s use.
For stable cracks, a low-viscosity epoxy resin can be used to penetrate and bond the sides of the crack. In many cases, installers broadcast a dry silica sand into the wet epoxy to add body and improve sanding and grindability.
For cracks that need a faster return to service, polyurea and certain polyurethane crack fillers cure quickly and can be shaved flush. They’re popular for commercial environments where downtime costs money.
For areas with slight movement risk, some systems use a semi-rigid filler that can tolerate minor movement better than a brittle patch. It still won’t “stop” movement, but it can reduce edge chipping and coating stress.
The main point: you’re not just filling a gap. You’re rebuilding support under a coating that will see traffic, hot tires, pallet jacks, chemicals, and cleaning.
Step 5: Fill properly and overfill slightly
Repairs should be placed in a way that avoids trapping air. With very fluid epoxy, you may need to work in lifts on deeper cracks.
Overfill slightly so you can grind the repair flush. If you fill it perfectly level and the material shrinks or settles, you’ll end up with a depression that will show through the epoxy topcoat.
Let it cure fully. Rushing this step can cause smearing during grinding and can interfere with coating adhesion.
Step 6: Grind the floor – not just the repair
This is where epoxy floors are won or lost.
Grinding does two jobs: it levels the repair and it creates the concrete surface profile epoxy needs for mechanical bond. Even a perfectly filled crack can fail if the surrounding slab is still smooth, sealed, or weak at the surface.
If the slab has multiple repairs, spalling, or pitting, a skim coat can be applied after grinding to create a clean, uniform canvas. That’s often the difference between a floor that looks “patched” and a floor that looks purpose-built.
Step 7: Prime and coat with a system that matches the site
Once cracks are repaired and the slab is properly profiled, the epoxy system should match the environment.
Garages need hot-tire resistance and good cleaning performance. Warehouses and back-of-house commercial spaces often need higher build, abrasion resistance, and optional non-slip texture for safety. Kitchens and food-adjacent areas may call for chemical resistance and easy sanitation.
If moisture is present, you may need a moisture-mitigating primer or a different coating approach altogether. Skipping that decision is how coatings blister or delaminate.
Will the crack still show after epoxy?
Sometimes, yes – and being realistic here saves frustration.
If a crack is stable and properly repaired, you can usually achieve a smooth finish that doesn’t telegraph. But if the slab continues to move, the crack may reflect back through the coating as a faint line, or in the worst case, it can open and break the coating.
That’s why crack type matters, and why joint strategy matters too. Control joints are designed to move. Coating over them without a plan is a common reason you’ll see straight-line cracking later. In many commercial settings, it’s smarter to honor joints and detail them correctly rather than trying to “make them disappear.”
When it’s time to bring in a pro
If you’re seeing vertical displacement, multiple intersecting cracks, moisture signs, or widespread surface weakness, professional prep is usually the best value. The equipment matters – not just for speed, but for consistency. Dust-controlled grinding, proper repair materials, and a system built for your traffic levels are what turn epoxy from a nice-looking upgrade into a long-wearing floor.
If you’re in Sydney or across NSW and want a floor that’s built to last, Floor Masters can assess the slab, handle crack repairs and grinding, and install an epoxy system that fits how the space is actually used. You can learn more at https://Floormasters.com.au.
A good epoxy floor starts with the part nobody brags about – the prep. Get the cracks right, and the coating finally gets the chance to do its job for years instead of months.